
1.
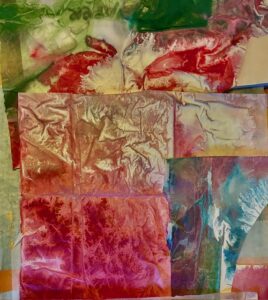
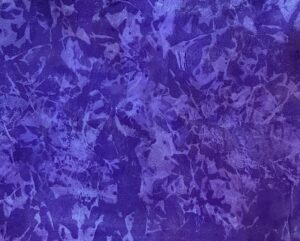
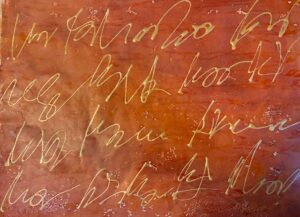
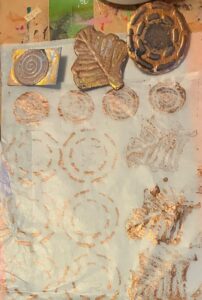
These are collage papers that I painted for later use. Top to bottom-
1. Gift wrap tissue paper. I took empty bottles of acrylic ink and paint, added water, and spread the watery paint onto tissue paper. They mix and end up like this. It takes at least a day to dry, but they’re pretty.
2. The blue one- I used crumpled paper for this design. Two layers of paint.
3. The scribble one-I took a paper with a background color and used a fine liner bottle to add asemic writing. It doesn’t say anything. It just looks like it does.
4. The last one-I made stamps out of foam meat trays or craft foam and stamped designs onto wet strength tissue paper. They aren’t all useable, but most are. I cut out the one I want and use matte or gloss medium to add it to a collage.
2.
3.
4.
These are so cool! You are clearly having fun with these, Deb. I can’t wait to see what you do with them!
You do such wonderful work with paper and adding all the different elements to it, be it stamping, pen, string or just crushing the paper plus the beautiful bright colors you use are terrific.
These are all so interesting.and inspiring! I love your idea in #1, utilizing the acrylic ink residue… I know a place with a lot of such bottles… Your script in #3 has such elegant line and fluidity. Beautiful! You fueling up for some unique collages methinks,,,
These are great Deb, and thank you for telling us how you made them. It will also be fun to see what you do with them. It’s not so easy…I just did 4 tiny 21/2# square collages to go in some frames I like. They took some time. I really like starting with some collage so these directions will be helpful!
They are all incredible, especially #1. I’m going to try your technique with tissue paper (which I happen to love with it’s texture and crinkle). And #2 is so vibrant. Your paper work is so inspiring.
I love the beautiful colors and textures you created in the #1. I look forward to seeing how you incorporate all these papers into your future works.
Les